Making a photorealistic rendering is not just a matter of “making it look real.” The development of a photoreal scene has to take into account how your textures are captured (photographed) and processed (saved by the camera or computer). Some behind-the-scenes activities with your textures, such as gamma correction, could be ruining any chance of photorealism in your rendering.
So, what is gamma correction, exactly? Let’s take a look at why it was developed and how it works.
Your eyes vs. your camera
Let’s start with the fact that a camera captures light intensities uniformly, while our eyes do not.
The human eye has evolved to see details within shadows and darker areas. This served us well back when our ancestors had to hunt for things to eat (or avoid things that might eat us). But distinguishing details in a bright area, such as picking out slightly different shades of blue in a bright daytime sky, has not been so important to us.
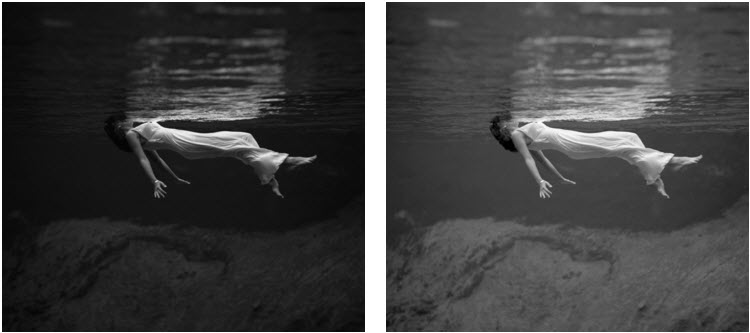
A camera, however, picks up light intensities uniformly, and treats all light intensities equally—a camera doesn’t toss out the detail in bright areas and punch up the darks the way our eyes do. For this reason, a raw photo straight from the camera, with its uniform dark intensities, will look dark to us.

Image on right: photo after gamma correction, revealing details in the dark areas.
This is where gamma correction comes in. Gamma correction takes the full range of light intensities captured in a photo and re-distributes the intensities to emphasize the darker areas, producing an image that looks more “real”.
Gamma value mapping
Gamma correction works by taking a linear scale of light intensity and mapping the scale to a set of values that form a curve.

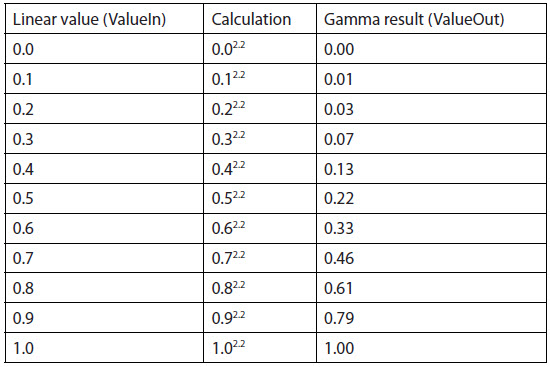
At right, a graph of linear vs. non-linear (curved) values for gamma correction.
Notice that the second set of values favor darker shades. When this gamma correction is applied, there’s more detail in the darker areas, making the image look more realistic.
Why, you may ask, can’t we just lighten the image? Wouldn’t that produce the same result? The answer is no. Lightening the entire image will make it look washed out, not more realistic.
What is gamma 2.2?
You will see gamma correction referred to as a single numerical value. For example, “a gamma of 2.2” is very common. What does this mean?
The 2.2 refers to the exponent used to calculate the new set of light intensity values for the graph. The formula is:
ValueOut = ValueIngamma
Let’s try this calculation to find out the graph values for a gamma of 2.2.

Your photos are probably gamma-corrected already
In the digital world, gamma correction happens all the time. Televisions and monitors perform gamma correction on images so viewers will find the imagery more realistic. If your camera has an LCD screen for immediate viewing of the photo, the image is gamma-corrected on its way to the display. If you save the photos to your computer, the gamma correction is probably baked into the image before it’s saved. Even your 3D renderings are likely to be automatically gamma-corrected before they’re saved (this is the default setting in a lot of software).
This automatic correction happens because the designers of displays assume that if you have a photo, you just want to look at it, not use it as a texture map in a 3D scene. Before you use a photo as a texture in your 3D software, you will need to undo any gamma correction on it. Otherwise, any part of the rendering that includes the texture will be double gamma-corrected, and will look washed out.
You can reverse gamma correction by applying a gamma of 0.45 to an image. However, there will likely be some loss of fidelity from this round trip through gamma correction.
Fortunately, you can usually avoid the first gamma correction with camera settings, or by using images that preserve the full range of light intensities. Being aware of what gamma correction can do, you can wisely choose when to use it and when to avoid it. And now maybe you can read the Wikipedia definition of gamma correction without getting crossed eyes.
